Elegant Themes Bloom Email Opt-Ins
$89.00 Original price was: $89.00.$4.49Current price is: $4.49.
- Very cheap price & Original product !
- We Purchase And Download From Original Authors
- You’ll Receive Untouched And Unmodified Files
- 100% Clean Files & Free From Virus
- Unlimited Domain Usage
- Free New Version
- License : GPL
- Product Version : 1.3.12
Last updated on : August 21st, 2024
DOWNLOAD NOW!
This and 3000+ plugins and themes can be downloaded as a premium member for only $15. Join The Club Now!Elegant Themes Bloom Email Opt-Ins
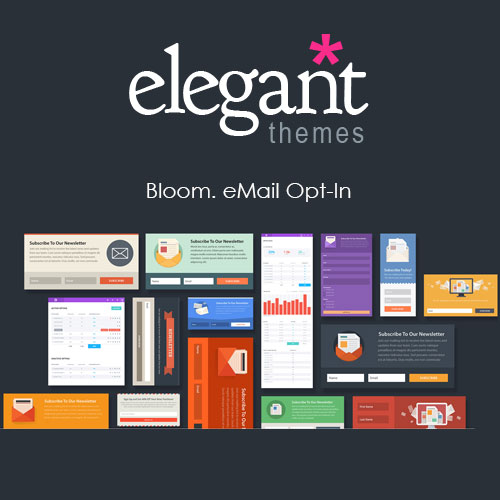
Bloom is an email opt-in plugin developed by Elegant Themes, designed to help WordPress site owners grow their email lists efficiently and effectively. With its beautifully designed templates, advanced targeting options, and seamless integration with popular email marketing services, Bloom is a must-have tool for anyone serious about email marketing.
This guide explores the features of Bloom, how to set it up, and best practices for maximizing your email opt-ins.
Key Features of Bloom Email Opt-In Plugin
1. Multiple Opt-In Form Types
Bloom offers a wide variety of opt-in form types to suit different marketing strategies and user experiences.
- Pop-Up Opt-Ins: Trigger pop-up forms to capture visitors’ attention. You can control when and how these appear.
- Fly-In Opt-Ins: Display fly-in forms that slide into view as visitors scroll down the page.
- Inline Opt-Ins: Embed opt-in forms directly within your content, perfect for blog posts and pages.
- Below Content Opt-Ins: Place opt-in forms at the end of your posts or pages to catch readers after they’ve consumed your content.
- Widget Area Opt-Ins: Add opt-in forms to your sidebar or footer areas using a widget.
- Locked Content Opt-Ins: Require users to subscribe before they can access exclusive content.
2. Beautifully Designed Templates
Bloom comes with over 100 pre-made templates that are fully customizable. Each template is designed to be visually appealing and conversion-focused, helping you capture more leads.
- Customizable Design: Modify colors, borders, shadows, images, and fonts to match your brand.
- Form Orientation: Choose between vertical or horizontal form layouts to best fit your design needs.
3. Advanced Display Settings
Bloom allows you to control precisely where and when your opt-in forms are shown, ensuring they reach the right audience at the right time.
- Time Delay: Display forms after a specific time delay to capture visitors who are engaged with your content.
- Scroll Percentage: Trigger forms after a user has scrolled a certain percentage of the page.
- After Commenting: Show opt-in forms to users who have left a comment, targeting engaged visitors.
- After Purchase: Present forms to customers after they’ve completed a purchase, ideal for cross-promotion.
- After Inactivity: Capture the attention of inactive users with an opt-in form.
4. Targeting and Segmentation
Bloom offers advanced targeting features, allowing you to display opt-ins to specific audiences based on various criteria.
- Page-Level Targeting: Show different opt-in forms on specific pages or posts, ensuring your message is relevant.
- Category and Post Type Targeting: Target opt-ins by categories or custom post types to better segment your audience.
- Referral Detection: Display forms based on referral source, helping you tailor your opt-ins to visitors from different channels.
5. Seamless Email Marketing Integration
Bloom integrates with all major email marketing services, making it easy to add new subscribers directly to your lists.
- Popular Services Supported: Integrates with services like MailChimp, AWeber, ConvertKit, GetResponse, MailPoet, and more.
- Multiple Account Integration: Connect multiple accounts or lists to different opt-in forms for better list segmentation.
6. Actionable Analytics
Bloom provides insights into your opt-in form performance, helping you optimize your strategy.
- Conversion Rate Tracking: View statistics on impressions, conversions, and overall conversion rates for each form.
- A/B Testing: Run split tests to compare different opt-in form designs, triggers, and locations to find what works best.
7. Import and Export
Easily import or export your Bloom settings and opt-ins across different sites, streamlining the setup process for multiple projects.
How to Install and Set Up Bloom
1. Installing the Plugin
- Purchase and Download:
- Purchase Bloom from the Elegant Themes website and download the plugin zip file.
- Upload and Activate:
- Log in to your WordPress dashboard, navigate to Plugins > Add New, and click Upload Plugin.
- Select the Bloom zip file, click Install Now, and then Activate.
2. Configuring Bloom Settings
- Access Bloom Dashboard:
- After activation, you’ll find the Bloom dashboard under the Tools menu in your WordPress admin area.
- Connect Your Email Marketing Service:
- Go to Bloom > Email Accounts and add your preferred email marketing service by selecting it from the list and entering your API key.
- Create an Opt-In Form:
- Click New Opt-In and choose the type of form you want to create, such as a pop-up or inline form.
- Customize the Form:
- Select a template and customize it using the design settings. Adjust colors, text, images, and form orientation to match your brand.
- Set Display Rules:
- Define the trigger and targeting options for your form. For example, set it to appear after a time delay or when a visitor reaches the end of a post.
- Publish Your Opt-In:
- Once you’ve configured the settings, save and publish your opt-in form. It will now start collecting subscribers based on your rules.
3. Managing and Optimizing Opt-Ins
- Monitor Performance:
- Use the analytics dashboard to monitor impressions, conversions, and conversion rates for each opt-in form.
- A/B Testing:
- Create variations of your forms to test different designs, headlines, or triggers. Use the A/B testing feature to identify which version performs best.
- Adjust Based on Data:
- Regularly review performance data and make adjustments to improve your conversion rates, such as changing the form design, timing, or placement.
Best Practices for Using Bloom
1. Design for Your Audience
Ensure your opt-in forms align with your audience’s preferences. Use colors, images, and messaging that resonate with your target demographic to increase conversions.
2. Test Different Form Types
Experiment with various form types, such as pop-ups, fly-ins, or inline forms, to see which works best for your content and audience.
3. Use Segmentation
Take advantage of Bloom’s targeting options to segment your audience effectively. Display relevant opt-ins based on page type, category, or user behavior to increase sign-ups.
4. Implement A/B Testing
Regularly run A/B tests to optimize your opt-in forms. Test different headlines, button colors, or triggers to discover what drives the most conversions.
5. Keep Forms Simple
Avoid overwhelming visitors with too many fields. A name and email address are often sufficient. Simple forms lead to higher conversion rates.
6. Leverage Social Proof
If possible, display the number of current subscribers or testimonials to build trust and encourage more sign-ups.
7. Offer Valuable Incentives
Increase opt-ins by offering incentives like free eBooks, discounts, or exclusive content. Make sure the offer is compelling enough to encourage subscriptions.
Conclusion
The Elegant Themes Bloom Email Opt-Ins plugin is an essential tool for growing your email list with style and efficiency. With its extensive customization options, advanced targeting features, and seamless integration with popular email services, Bloom is perfect for marketers and site owners who want to boost their subscriber base. By following the setup guide and best practices outlined above, you can create high-converting opt-in forms that resonate with your audience and drive meaningful results.
Be the first to review “Elegant Themes Bloom Email Opt-Ins” Cancel reply
Related products
WooCommerce Plugins
WooCommerce Plugins
Security
Wordpress Plugins
Astra
WooCommerce Plugins


Reviews
There are no reviews yet.