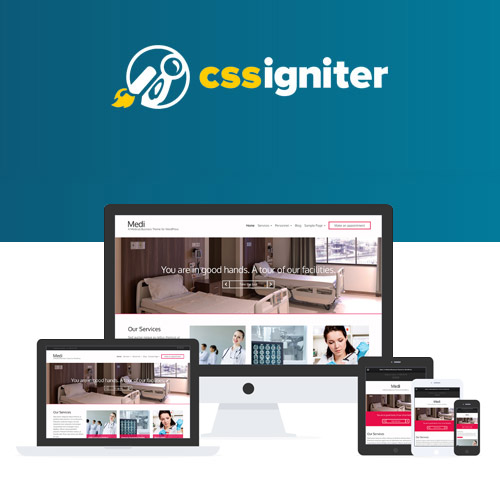
CSS Igniter Medi WordPress Theme
$49.00 Original price was: $49.00.$4.49Current price is: $4.49.
- Very cheap price & Original product !
- We Purchase And Download From Original Authors
- You’ll Receive Untouched And Unmodified Files
- 100% Clean Files & Free From Virus
- Unlimited Domain Usage
- Free New Version
- License : GPL
- Product Version : 1.7.1
Last updated on : August 14th, 2024
DOWNLOAD NOW!
This and 3000+ plugins and themes can be downloaded as a premium member for only $15. Join The Club Now!CSS Igniter Medi WordPress Theme: The Ultimate Theme for Healthcare and Medical Websites
The CSS Igniter Medi WordPress Theme is a purpose-built theme designed specifically for healthcare professionals, medical clinics, hospitals, and related organizations. With a clean and professional design, Medi offers a variety of features tailored to the needs of the medical industry, making it an ideal choice for anyone looking to establish a strong online presence in the healthcare sector.
Key Features of CSS Igniter Medi WordPress Theme
1. Professional and Clean Design
- Medical-Focused Aesthetics: Medi’s design is clean, professional, and geared towards healthcare services, ensuring that your website reflects the trust and reliability associated with medical institutions.
- Customizable Layout: Easily customize the layout to fit your brand’s specific look and feel, with options for colors, fonts, and more.
2. Responsive and Mobile-Friendly
- Mobile Optimization: The theme is fully responsive, ensuring that your website looks great on all devices, from desktops to mobile phones.
- User-Friendly Navigation: Medi’s navigation is optimized for easy use across all devices, ensuring a smooth experience for users.
3. Custom Post Types for Medical Services
- Service Pages: Medi includes custom post types designed specifically for medical services, allowing you to create detailed pages for each service your practice offers.
- Service Categories: Organize your services into categories, making it easier for visitors to find the information they need.
4. Doctor and Staff Profiles
- Team Member Showcase: Highlight your medical staff with dedicated profile pages, including their credentials, specialties, and contact information.
- Trust-Building: Featuring your team helps build trust with potential patients by showing the qualified professionals behind your practice.
5. Appointment Booking System
- Integrated Booking Form: The theme includes a built-in appointment booking form, allowing patients to easily schedule consultations directly from your website.
- Third-Party Compatibility: Medi is compatible with popular appointment booking plugins, offering extended functionality if needed.
6. Testimonial and Review Management
- Patient Testimonials: Showcase positive reviews and testimonials from satisfied patients to build credibility and attract new patients.
- Custom Widgets: Use custom widgets to display testimonials prominently on your homepage or other key pages.
7. Blog and News Section
- Content Marketing: Medi includes a blog section, perfect for sharing health tips, news, and updates to keep your audience informed and engaged.
- SEO Benefits: Regularly updating your blog with valuable content can help improve your website’s SEO and attract more visitors.
8. SEO and Performance Optimization
- SEO-Friendly Design: Medi is built with SEO best practices in mind, helping your medical website rank higher in search engine results.
- Fast Loading Times: The theme is optimized for speed, ensuring a quick and smooth user experience for all visitors.
9. WooCommerce Compatibility
- E-Commerce Ready: If you sell healthcare products or services online, Medi is fully compatible with WooCommerce, allowing you to set up an online store with ease.
- Seamless Integration: WooCommerce pages are styled to match the rest of the theme, ensuring a consistent and professional appearance.
10. Translation and Multilingual Support
- Translation Ready: Medi is fully translation-ready, making it easy to offer your website in multiple languages to cater to a diverse audience.
- WPML Compatibility: The theme is compatible with the WPML plugin, enabling you to manage multilingual content effectively.
Setting Up CSS Igniter Medi WordPress Theme
1. Installation and Activation
- Install the Theme: Purchase and download the Medi theme from CSS Igniter, then install it through your WordPress dashboard by navigating to Appearance > Themes > Add New.
- Activate the Theme: Once installed, activate the theme to start customizing your healthcare website.
2. Import Demo Content
- One-Click Demo Import: Use the one-click demo import feature to quickly load demo content, which provides a great starting point for your site.
- Customize Demo Content: Replace the demo content with your own images, text, and media to reflect your medical practice’s unique offerings.
3. Set Up Service Pages
- Create Service Listings: Add your medical services as individual pages, including detailed descriptions, images, and any relevant information.
- Organize Services: Categorize your services (e.g., General Practice, Pediatrics, Surgery) to make it easy for visitors to navigate.
4. Configure the Appointment Booking System
- Enable the Booking Form: Set up the integrated booking form to collect the necessary information from patients making appointments.
- Manage Appointments: View and manage appointments directly from your WordPress dashboard, ensuring efficient patient scheduling.
5. Add Doctor and Staff Profiles
- Create Profiles: Add profiles for each doctor and staff member, including their qualifications, areas of expertise, and contact information.
- Feature Key Staff: Highlight key staff members on your homepage or about page to build trust with potential patients.
6. Customize the Homepage
- Drag-and-Drop Builder: Use the drag-and-drop builder to design your homepage, featuring sections for services, testimonials, and doctor profiles.
- Highlight Important Information: Make sure to display essential information such as contact details, location, and office hours prominently.
7. Set Up WooCommerce
- Install WooCommerce: If you plan to sell products or services online, install WooCommerce and configure the necessary settings.
- Add Products: Add healthcare products or services for sale, ensuring they are well-presented and easy for customers to purchase.
8. Optimize for SEO
- Install an SEO Plugin: Use a plugin like Yoast SEO to optimize your content for search engines, helping to improve your site’s visibility.
- Optimize Images: Compress images to ensure fast loading times without sacrificing quality, enhancing user experience.
9. Integrate Social Media
- Connect Social Accounts: Link your social media accounts to your website, and display social media feeds to keep patients engaged.
- Encourage Social Sharing: Add social sharing buttons to blog posts and service pages to encourage patients to share your content.
10. Test and Launch
- Cross-Browser Testing: Test your site on various browsers and devices to ensure it looks and functions correctly.
- Final Adjustments: Make any final tweaks before launching your site to the public, ensuring everything is polished and ready.
Best Practices for Using Medi Theme
1. Focus on User Experience
- Easy Navigation: Ensure that your website is easy to navigate, with clear menus and quick access to essential information.
- Accessible Content: Use large fonts and high-contrast colors to make your site accessible to all users, including those with visual impairments.
2. Keep Service Information Up-to-Date
- Regular Updates: Regularly update your service pages with the latest information, including new treatments, procedures, and staff members.
- Highlight Special Services: Feature any special services or new offerings prominently on your homepage to attract attention.
3. Build Trust with Testimonials
- Showcase Patient Reviews: Display testimonials from satisfied patients to build trust and credibility with potential new patients.
- Encourage Feedback: Ask for feedback from patients and feature their positive experiences on your site.
4. Leverage Content Marketing
- Health Tips Blog: Use the blog section to share health tips, news, and updates, providing valuable content to your audience.
- Engage with Patients: Regularly post new content to keep your audience engaged and encourage them to return to your site.
5. Optimize for Mobile Users
- Mobile-Friendly Design: Ensure that your site’s design is optimized for mobile users, with easy navigation and a seamless appointment booking experience.
- Mobile Testing: Regularly test your site on mobile devices to ensure it functions well and provides a positive user experience.
Troubleshooting Common Issues
1. Booking Form Errors
- Form Validation: Ensure that all required fields in the booking form are correctly validated to prevent submission errors.
- Email Notifications: Check that email notifications for appointments are set up correctly and functioning as expected.
2. Display Issues on Mobile Devices
- Responsive Design: If your site isn’t displaying correctly on mobile devices, check the responsive design settings and adjust as needed.
- Cross-Browser Compatibility: Test your site across different browsers and devices to ensure consistent performance.
3. WooCommerce Integration Problems
- Product Display Issues: If products or services aren’t displaying correctly, review the WooCommerce settings and ensure they are configured properly.
- Payment Gateway Errors: Regularly test payment gateways to ensure smooth and secure transactions.
Conclusion
The CSS Igniter Medi WordPress Theme is an exceptional choice for healthcare professionals and medical institutions looking to build a strong online presence. Its professional design, specialized features, and ease of customization make it a powerful tool for showcasing your services, building trust with patients, and driving engagement.
By following the setup instructions and best practices outlined in this guide, you can effectively use Medi to create a successful and user-friendly website that reflects the professionalism and quality of care your practice provides. Whether you run a small clinic or a large hospital, Medi offers the flexibility and features you need to thrive in the competitive healthcare industry.
Be the first to review “CSS Igniter Medi WordPress Theme” Cancel reply
Related products
BuddyBoss & Social Learner
Multipurpose
Education


Reviews
There are no reviews yet.